The fabric requirements & tutorial below are for one block only, but I've also included a 5 x 5 block layout to show you how the blocks interact together. I love the quilt pattern that emerges using this one block and only two fabrics -- I'll be making a big version for myself soon!
Fabric Requirements + Cutting Instructions//
Main Fabric | teal
cut: 2 squares, 3 1/2" x 3 1/2"; 1 rectangle, 3 1/2" x 9 1/2"; 2 squares, 4" x 4"; 8 squares, 2" x 2"
Background Fabric | white
cut: 2 squares, 4" x 4"; 8 rectangles, 2" x 3 1/2"; 4 rectangles, 2" x 5"Fabric Requirements + Cutting Instructions//
Main Fabric | teal
cut: 2 squares, 3 1/2" x 3 1/2"; 1 rectangle, 3 1/2" x 9 1/2"; 2 squares, 4" x 4"; 8 squares, 2" x 2"
Background Fabric | white
Sewing//
Step One.
Draw a diagonal line, from corner to corner, on the wrong side of two 4" background squares.
Step Two.
Layer one marked 4" background square and one 4" main fabric square, right sides together. Sew 1/4" on each side of the line. Cut on the line. Press seams open. This makes 2 half square triangles. Trim half square triangles to 3 1/2" square. Repeat to the remaining background & main fabric pair, to make 4 half square triangles.

Step Three.
Draw a diagonal line, from corner to corner, on the wrong side of eight 2" main fabric squares.
Step Four.
Layer one marked 2" main fabric square and one 2" x 3 1/2" background rectangle. Make sure the line runs from the upper right corner to lower left corner. Sew on the marked line. Trim corner, leaving a 1/4" seam allowance. Press seam towards the main fabric.
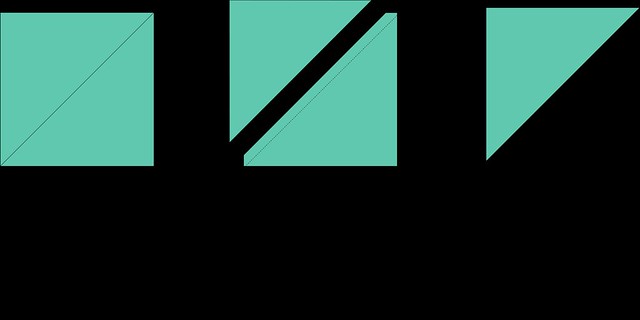
Step Five.
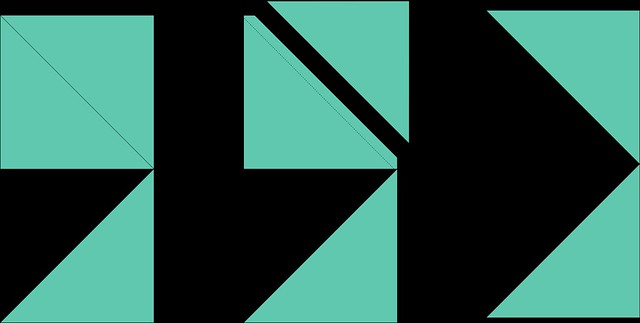
Repeat step four to the other side, making sure the line runs from upper left corner to lower right corner.
Step Six.
Repeat steps 4-5 to three 2" x 3 1/2" background rectangles, making a total of four flying geese units. Please note: the diagram above does not show the seam allowance for the flying geese block.
Block Layout//
Step One.
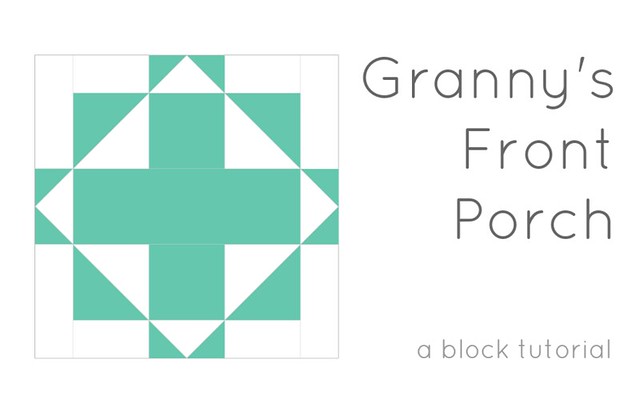
Layout the block, using the diagram below. Sew the block together using a 1/4" seam allowance, press seams open.
Finished block measures 12" x 12".
 |
| 5 x 5 block layout |
xo, Megan.




Thanks, this is great :)
ReplyDeleteBeautiful! Thanks for the tutorial.
ReplyDeleteAmanda
I love the simplicity of this block with only 2 fabrics.
ReplyDeleteI love this! I keep imagining it in a monochromatic color scheme--like light blue and dark blue, or really any other monochromatic combination. So wonderful!
ReplyDeleteI also didn't realize at first that it was only one block in the full-quilt preview--I thought half of the blocks were made with the colors reversed. Then I saw that it was just the way the design worked. Beautiful design!
Whoa, this is fantastic! "Modern Traditionalism" at its finest.
ReplyDeleteI love the full quilt, it's so tribal but modern. Giving me the itch to pull a pretty teal and get to work...
ReplyDeleteThis is lovely. Such beautiful eye candy in your straight line quilting post, by the way. Yum!
ReplyDeleteYou and your gram are so talented. I just love this block. Thank you for posting the tutorial.
ReplyDeleteI love this block! I can see so many possibilities in it. Thanks for sharing...
ReplyDeleteThanks for the tutorial. I'm already envisioning picking out fabrics for this when I get home tonight!!! I've pinned this tutorial to my "Quilty Goodness" board on Pinterest (with proper credit, of course!). Feel free to follow me if you'd like: http://pinterest.com/lipglass/quilty-goodness/
ReplyDeleteThanks so much for the block tutorial! I love it so much I dug right in. I had a kit to make another quilt in the same colors as your little digital mock up, so I switched it over to this instead. I'm using 3 colors. I'll be back to post a link and upload pics to Flickr when it's done. =)
ReplyDeleteThis comment has been removed by the author.
ReplyDelete